Friday, 28 January 2011

Post 19 - Polypaint and Armour Updates


I have most recently been experimenting with polypainting. Essentially, polypaint allows the user to paint directly onto the mesh by having an influence over the vertices colour, and the gradual surrounding area (similar to a spray can in Photoshop). I have managed to give the figure an initial skin tone, as well as detailing the eyes. This was done using a selection of spray brushes as well as the regular colour palette.

The eyes were done in a very similar way, but with the addition of a simple alpha stamp for the iris / pupil and a more elaborate vein alpha for the capillary detailing. The eyes are at this stage roughed out and are for representation only. I intend to change these towards the end of the project.

I've also added more armour detailing and have created some boots. There are two boot variations as I wasn't happy with the first attempt. The first pair were made from a zsphere mesh. The second pair were made from a cube mesh. As I am going for an angular and crisp look to my armour, I feel that the second attempt are more fitting and so the first pair have been archived.



Post 18 - Initial Armour Creation

Now that the issues of extracting error geometry have been dealt with, I have now created a basic armour from the various extracted meshes. In order to keep track of the sub-tools, each one has been labeled (i.e. the chest piece is labeled 'chest')


Above is the result. These have been moved, pinch and smoothed to create the desired shapes. The armour is starting to shape up and conforms to the kind of space, sci-fi look I have been aiming for. Before I start detailing them, I need to create the shoes, as well as start thinking about painting and texturing the base mesh.

Post 17 - Extraction: SOLUTION

Image from Pixologic.com
I have just discovered a link to a forum from Pixologic.com. Here is the link:


After days of searching for a solution or work around, I saw an image, (posted in by the user who was having problems). It immediately became apparent that this looked like the same problem I was having. The forum suggested several tests that could be preformed to see if there were any defeats in the mesh itself. Although the user ended up finding his own solution, the member named 'Degenerate Triangle' suggested the following:

To delete geometry in ZBrush by simply selecting the troublesome geometry using the shift and control keys. Then, by going to the geometry drop down menu and selecting 'delete hidden' this would remove anything which was previously hidden. 

As none of the troublesome geometry is connected with the recently extracted sub tool, this process was straight forward and worked 100%. This is a massive relief for me as I can now continue with creating the armour.

Whilst I was trying to find a solution to this problem, I decided to edit a previously made Prezi presentation. The original presentation was made for a Research Practice task, but I have duplicated it, then tailored it to show all of the 3D modeling research and resources I have been using for this project. This would also tie in with additional content for my Task Two. here is the link:

http://prezi.com/uvukts9csmcr/3d-modeling-research/

It covers all of the major resources that I have listed as being useful for this project and ranges from books and websites to magazines and other media based resources.

Post 16 - Extraction Problem!!!


I started to experiment with extracting parts of the mesh in order to make the armour for my character. Unfortunately, I have just discovered what could be quite a major issues.


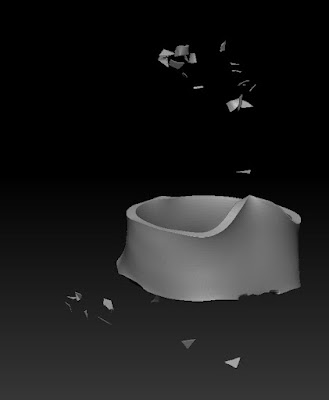
As these images show (highlighted issues areas with white circles), I have created a kind of t-shirt for my character, as a test. The masked off area has extracted well, but what has concerned me was the appearance of additional geometry. This should not of been duplicated, and its as if part of the mesh (or connecting geometry) has sprung open as a result of this function. Even when areas have been specifically masked off, it always happens in the same place areas. These are: The face, feet, wrists and elbows. This may be connected with the zsphere method for creating a base mesh as it appears to occur at significant joins, or changes in the direction of the geometry. 

One solution I tried to put into practice was to export the sub tool as an OBJ file. Then import it into Autodesk's 3ds Max and clean it up in their. Then export and import back into ZBrush. This did work to an extent, but due to the size of the mesh, plus the various conversion hurdles, the result was a sub tool with poor topology and could not be edited on.

I have tried to theorise as to what is causing this to happen and has stopped my progress. Until this is dealt with, I will be unable to create any armor. I will keep trying possible solutions and inquiring online for any solutions or alternatives.

Post 15 - Stage Six: Ears and Armour


At this stage in the project, I feel that both the form of the body and face are complete. This was done using tools such as:

Standard, flatten, smooth, move, pinch, clay tubes, clay build, mallet, polish and inflate. I am very pleased with the outcome, particularly the face. As we experience human faces every day throughout our entire lives, we inevitably become very critical of things when they 'don't quite seem right'. If there was anything massively wrong with my figure, or it's face it would be easily recognisable. But I have now got it to a state where by it is quite realistic. This was done by subdividing the mesh (increasing the amount of polygons, which make up the mesh). This reduces poly stretch and helps create more detail. I have also decided that from now on, I shall be using a different material to sculpt and edit with. Instead of 'Wax Rd', I shall now be using 'Mat Cap Grey'. This is because it gives a more desirable surface to work with, plus it is better at showing imperfections and detail.

So now that I am happy with the figure, I have started to create the armour. I am currently experimenting with creating a kind of vest (which can sort of be seen in the pictures above. This is potentially a simple process in ZBrush and is as follows. firstly, you mask off an area of the base mesh (human figure) that you wish to create armour, or clothing for (such as the chest). Then, by selecting the 'extract' button in the sub tools drop down menu, this copies the selected part of the mesh and saves this as a different tool. There are various settings for thickness, and smoothing (depending on what type of material the extracted mesh is suppose to represent).

Post 14 - Project Stage Three - Five


I should point out in this post to avoid confusion that I am saving out my progress and calling it 'Stage', followed by which number I am on. This is so that I can log my progress, plus if I make a mistake, or want to revert back to an earlier version, I can do so. 

The last blog was on stage three. I am now on stage five. Since stage five, the following has been added to the figure. After having a discussion with Shane Mitchell (module tutor), ha gave me some constructive criticism regarding some of the parts of the anatomy. Some included lifting and straightening the collar bone, adding more detail in the back, altering the back of the thigh and calve, as well as filling out the neck and reducing the definition of the shoulder muscles. These have now been dealt with and improved on.
In addition, I have also managed to create a set of eyes and appended them as a sub tool. I made a sphere mesh, which I then made into a ploy-mesh 3D, allowing me to edit and alter it. I added a very slight alpha 'ring' layer to simulate the iris, then duplicated it and used the edit - move tool to position the second eye in the correct place. The nose and the lips have also been improved on and I've managed to close the mouth. This was achieved by masking off the lips that I wanted to keep still, then used the move ztool to move the unmasked area. This process was then repeated the the other lip, until it made for a convincing effect.

Post 13 - Mesh Manipulation


I have spent about a week using the simple tools in order to create a suitable mesh with which to start detailing. I have also started to block out some of the muscle and the basic shape of the arms and legs. I have used Clay Tubes, as they create a raised square shape, which effectively is like applying strips of clay on a model. When the intensity of the tool is reduced, it can be used as an extensive layering tool. This way, I can build up the model gradually and take a step back every so often in order to assess the figure's silhouette. I have yet to model the ears and much of the head, but this is possibly the next step to tackle.

In addition, there currently are no eyes. I was going to add additional clay to the center of the eye sockets, but as they would need to be detailed and textured, it would be wise to add them as a different layer, or as a separate tool.When this is done, other tools can be appended to you main figure. These tools then become 'sub tools' and can be arranged much like layers in Adobe Photoshop in order of hierarchical importance. This is suggested in the Scoot Spencer book, so I will do this after I have formed the body and made it more anatomically correct.