Friday, 28 January 2011
Post 15 - Stage Six: Ears and Armour
At this stage in the project, I feel that both the form of the body and face are complete. This was done using tools such as:
Standard, flatten, smooth, move, pinch, clay tubes, clay build, mallet, polish and inflate. I am very pleased with the outcome, particularly the face. As we experience human faces every day throughout our entire lives, we inevitably become very critical of things when they 'don't quite seem right'. If there was anything massively wrong with my figure, or it's face it would be easily recognisable. But I have now got it to a state where by it is quite realistic. This was done by subdividing the mesh (increasing the amount of polygons, which make up the mesh). This reduces poly stretch and helps create more detail. I have also decided that from now on, I shall be using a different material to sculpt and edit with. Instead of 'Wax Rd', I shall now be using 'Mat Cap Grey'. This is because it gives a more desirable surface to work with, plus it is better at showing imperfections and detail.
So now that I am happy with the figure, I have started to create the armour. I am currently experimenting with creating a kind of vest (which can sort of be seen in the pictures above. This is potentially a simple process in ZBrush and is as follows. firstly, you mask off an area of the base mesh (human figure) that you wish to create armour, or clothing for (such as the chest). Then, by selecting the 'extract' button in the sub tools drop down menu, this copies the selected part of the mesh and saves this as a different tool. There are various settings for thickness, and smoothing (depending on what type of material the extracted mesh is suppose to represent).
Post 14 - Project Stage Three - Five
I should point out in this post to avoid confusion that I am saving out my progress and calling it 'Stage', followed by which number I am on. This is so that I can log my progress, plus if I make a mistake, or want to revert back to an earlier version, I can do so.
The last blog was on stage three. I am now on stage five. Since stage five, the following has been added to the figure. After having a discussion with Shane Mitchell (module tutor), ha gave me some constructive criticism regarding some of the parts of the anatomy. Some included lifting and straightening the collar bone, adding more detail in the back, altering the back of the thigh and calve, as well as filling out the neck and reducing the definition of the shoulder muscles. These have now been dealt with and improved on.
In addition, I have also managed to create a set of eyes and appended them as a sub tool. I made a sphere mesh, which I then made into a ploy-mesh 3D, allowing me to edit and alter it. I added a very slight alpha 'ring' layer to simulate the iris, then duplicated it and used the edit - move tool to position the second eye in the correct place. The nose and the lips have also been improved on and I've managed to close the mouth. This was achieved by masking off the lips that I wanted to keep still, then used the move ztool to move the unmasked area. This process was then repeated the the other lip, until it made for a convincing effect.Post 13 - Mesh Manipulation
I have spent about a week using the simple tools in order to create a suitable mesh with which to start detailing. I have also started to block out some of the muscle and the basic shape of the arms and legs. I have used Clay Tubes, as they create a raised square shape, which effectively is like applying strips of clay on a model. When the intensity of the tool is reduced, it can be used as an extensive layering tool. This way, I can build up the model gradually and take a step back every so often in order to assess the figure's silhouette. I have yet to model the ears and much of the head, but this is possibly the next step to tackle.
In addition, there currently are no eyes. I was going to add additional clay to the center of the eye sockets, but as they would need to be detailed and textured, it would be wise to add them as a different layer, or as a separate tool.When this is done, other tools can be appended to you main figure. These tools then become 'sub tools' and can be arranged much like layers in Adobe Photoshop in order of hierarchical importance. This is suggested in the Scoot Spencer book, so I will do this after I have formed the body and made it more anatomically correct.Friday, 21 January 2011
Post 12 - Phase One: Mesh Creation
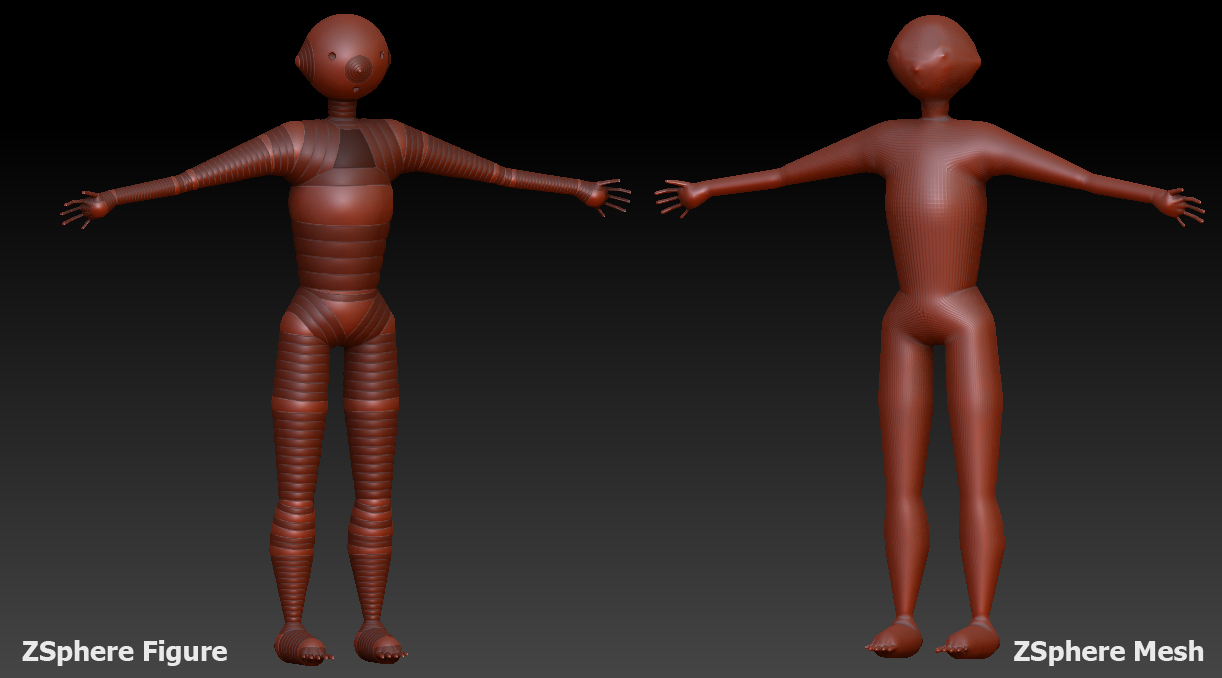
ZSphere to Adaptive Mesh
I have begun the creation of my base mesh. Although the DVD: Character modeling for Next - Gen Games (mentioned previously) was useful, the tutor Richard Smith uses a base mesh from Autodesk's Maya. I am not particularly familiar with this program, plus I have decided to make the initial mesh out of what are called ZSpheres. Using the book: ZBrush Digital Sculpting Human Anatomy, the second chapter describes the process of making the mesh out of these ZSpheres. It seems quite straight forward and so far has gone ok. Once I made the figure, I then created an adaptive skin. This topologies the zspheres and makes an approximate mesh out of the initial shape.
This is a good bases to start trying my hand at some sculpting. The book mentions the tools 'Standard' and 'Move' to make the mesh more like a human figure. So far I am pleased with the outcome and seems to make sense. No issues so far with ZBrush.
Wednesday, 19 January 2011
Post 11 - Gnomon Workshop DVD Resource
I have borrowed several DVDs from the Leeds Metropolitan University library. Their subject matter covers predominantly ZBrush, specifically its use in creating characters and full figure models. These were published by the Gnomon Workshop, a well known and reputable publisher of educational products aimed at 3D Software.
They are titled as follows:
Character Modeling for Next - Gen Games: Modeling and Sculpting with Richard Smith
Character Modeling in Maya and ZBrush: The Making of Jester Vol One
Character Texturing and Rendering: The Making of Jester Vol Two
Character Modeling for Next - Gen Games: Modeling and Sculpting with Richard Smith
Character Modeling in Maya and ZBrush: The Making of Jester Vol One
Character Texturing and Rendering: The Making of Jester Vol Two
Although at this stage it would be naive to think that I could do all tutorials and tasks featured in these DVDs, but they certainly will help with techniques, strategies and work flow when constructing base meshes. I have used some of the tips suggested in the first DVD so far such as how to approach a project and strategies.
Saturday, 11 December 2010
Post 10 - ZBrush Books
A book that I have recently been looking at is a book on ZBrush entitled: ZBrush Character Creation: Advanced Digital Sculpting, written by Scott Spencer, published by Sybex in 2008.
This looks like a great book and has a gradual learning curve as starts with the fundamentals of form, and emotion conveyance.
It is called: ZBrush Digital Sculpting Human Anatomy, also written by Scott Spencer, published by Sybex in 2010.
At first glance, this is a very interesting read and have already been using it to begin making a base figure mesh for my task three of my 3D Technology module.
Character Creation Link - http://www.sybex.com/WileyCDA/SybexTitle/ZBrush-Character-Creation-Advanced-Digital-Sculpting.productCd-047024996X.html
Human Anatomy Book Link - http://www.pixologic.com/blog/2010/01/zbrush-book-digital-sculpting-human-anatomy-by-scott-spencer/
Thursday, 2 December 2010
Post 09 - ZBrush Research
I have begun to research the digital sculpting software ZBrush, made by Pixologic. The sources for this research are mentioned in another one of my blogs and can be accessed by using this link.
However, these links can also be found below with a brief overview of them.
This website is great as it is updated regularly and is hosted by the creators of ZBrush. It includes interviews, case studies, examples of work as well and tutorials and hints and tips. I am currently going through the video tutorials.
A great online and printed magazine, which also features interviews (currently following the work of Cedric Seaut), case studies and tutorials. This website also provides free models, something which I am taking advantage of in my 3D Animation module)
This is a large magazine, which has been published exclusively on ZBrush. This includes a DVD which has over 20 tutorials on it, with over 10 hours of videos. This was published in November and will b of great help.
This website has been very useful and also contains many video tutorials for ZBrush. It covers similar ground to that of the Pixologic website, but as they are different tutorials, its always good to see how other people navigate and use the software.
At this stage, there seems to be a a lot of research into the modelling, sculpting sector, with relevance to games as this is what I am interested in. Animation is also an interest of mine, so some more research should be done in this area also.
I wish to soon look into a couple of case studies.
Links:
Pixologic website: http://www.pixologic.com/zclassroom/
3D Total website: http://www.3dtotal.com/
3D World - ZBrush Essential 'bookazine': http://www.3dworldmag.com/2010/10/21/zbrush-essentials/
CG.tutplus - ZBrush additional tutorials: http://cg.tutsplus.com/articles/web-roundups/tutorial-roundup-82-earth-shattering-zbrush-tutorials/
Subscribe to:
Posts (Atom)